My reasons for doing this write-up are two fold.
My first reason is to review the www.boostpro.net boost leak tester and then explain how to use it.
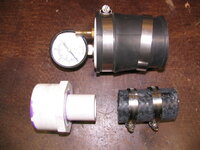
Boost Pro: boost leak tester w/gauge review:
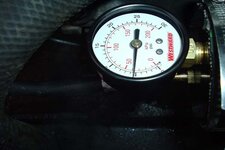
When ordering the tester you are giving an option for models with a guage or without. The unguaged model is $12 whereas the gauged model is $17. I choose the gauged model because it is so much more convienent not having to run around to look at my A pillar or having some in the car watching the gauge. Shipping was fast and the tester was well packaged. The tester is 3 inches in diamiter and about 1/2 thick made of sturdy black plastic. The schrader valve as well as the gauge are pre installed so that the tester is ready to go right out of the box. This is the only boost leak tester that I have seen for sale that is this proffesional looking. The price of both models is comprable to what one would pay to make their own tester out of plumbing peices but the look, feel and quality of the boost pro unit is top notch.
How to: Boost leak test using the Boost Pro: Boost leak tester: (note: this test was done on a 1g with a T04B running Maft translator in blow through mode.)
Warning: Only pressurize your intake to the amount of boost you run/ plan to run. If you over pressurize your intake tract damage may occur.
Tools Needed:
Screwdriver: Phillips or Flat head depending upon your hose clamps
Pliers: Bov return line clamp
Socket wrench
Socket set
Air compressor/Gas station
Others peices needed:
Oty. 1: Coupler to connect the boost leak tester to the turbo inlet. The Boost Pro unit is 3in in diameter so depending on your turbo size you will need a 3 x ( X ) coupler. If you're running a TO4B or TO4E you just need a 3 x 3 coupler. You will need to measure your turbo inlet to figure out what size coupler you will need.
Qty. 2 : Hose clamps/ T-bolt clamps. You will need 2 hose/ t-bolt clamps. One clamp needs to be at least 3in in diameter and the other depends on your turbo inlet size.
Step 1. Remove Intake/Air Box.
A. You will need to remove your stock air box and MAF, The air box is bolted in with 3 10mm bolts. Unplug your MAF and loosen the hose clamp on the intake pipe holding the MAF in place. Now the air box and MAF can be removed.
B. Remove the BOV return hose and PCV valve hose.
C. Loosen the hose clamp that holds the intake pipe to the turbo and remove the intake pipe.
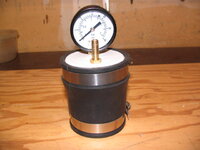
Step 2. Install coupler & hose clamps on the Boost Pro: boost leak tester.
A. It may take a small amount of elbow grease to get the coupler to fit over the tester
B. Once you have the coupler where you want it put a hose clamp on where the coupler and boost leak tester overlap to hold the tester in place when you pressureize the intake.
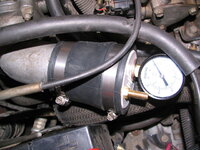
Step 3. Install the boost leak tester along with coupler and hose clamps onto the turbo inlet. Make sure that both clamps are tight.
Step 4. Pressureize the Intake Track:
A. Get out your air compressor (make sure you have the fitting that you use for inflating tires on) and simply place the hose from the air compressor onto the schrader valve of the boost leak test.
B. Watch the gauge on the boost leak tester so you don't over pressureize.
C. Once you reach your desired pressure remove the air hose and listen for leaks.
Step 5. Fix leaks and re test
Step 6. Uninstall tester and reinstall your intake pipe, MAF (remember to plug it in) & Air Box, BOV return line and PCV line.
My first reason is to review the www.boostpro.net boost leak tester and then explain how to use it.
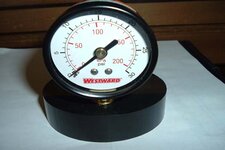
Boost Pro: boost leak tester w/gauge review:
You must be logged in to view this image or video.
When ordering the tester you are giving an option for models with a guage or without. The unguaged model is $12 whereas the gauged model is $17. I choose the gauged model because it is so much more convienent not having to run around to look at my A pillar or having some in the car watching the gauge. Shipping was fast and the tester was well packaged. The tester is 3 inches in diamiter and about 1/2 thick made of sturdy black plastic. The schrader valve as well as the gauge are pre installed so that the tester is ready to go right out of the box. This is the only boost leak tester that I have seen for sale that is this proffesional looking. The price of both models is comprable to what one would pay to make their own tester out of plumbing peices but the look, feel and quality of the boost pro unit is top notch.
How to: Boost leak test using the Boost Pro: Boost leak tester: (note: this test was done on a 1g with a T04B running Maft translator in blow through mode.)
Warning: Only pressurize your intake to the amount of boost you run/ plan to run. If you over pressurize your intake tract damage may occur.
Tools Needed:
Screwdriver: Phillips or Flat head depending upon your hose clamps
Pliers: Bov return line clamp
Socket wrench
Socket set
Air compressor/Gas station
Others peices needed:
Oty. 1: Coupler to connect the boost leak tester to the turbo inlet. The Boost Pro unit is 3in in diameter so depending on your turbo size you will need a 3 x ( X ) coupler. If you're running a TO4B or TO4E you just need a 3 x 3 coupler. You will need to measure your turbo inlet to figure out what size coupler you will need.
Qty. 2 : Hose clamps/ T-bolt clamps. You will need 2 hose/ t-bolt clamps. One clamp needs to be at least 3in in diameter and the other depends on your turbo inlet size.
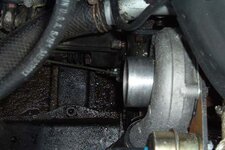
Step 1. Remove Intake/Air Box.
A. You will need to remove your stock air box and MAF, The air box is bolted in with 3 10mm bolts. Unplug your MAF and loosen the hose clamp on the intake pipe holding the MAF in place. Now the air box and MAF can be removed.
B. Remove the BOV return hose and PCV valve hose.
C. Loosen the hose clamp that holds the intake pipe to the turbo and remove the intake pipe.
You must be logged in to view this image or video.
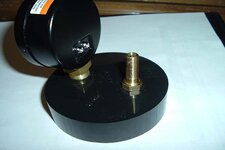
Step 2. Install coupler & hose clamps on the Boost Pro: boost leak tester.
A. It may take a small amount of elbow grease to get the coupler to fit over the tester
B. Once you have the coupler where you want it put a hose clamp on where the coupler and boost leak tester overlap to hold the tester in place when you pressureize the intake.
You must be logged in to view this image or video.
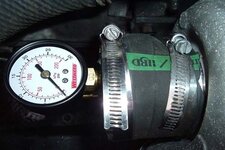
Step 3. Install the boost leak tester along with coupler and hose clamps onto the turbo inlet. Make sure that both clamps are tight.
You must be logged in to view this image or video.
Step 4. Pressureize the Intake Track:
A. Get out your air compressor (make sure you have the fitting that you use for inflating tires on) and simply place the hose from the air compressor onto the schrader valve of the boost leak test.
B. Watch the gauge on the boost leak tester so you don't over pressureize.
C. Once you reach your desired pressure remove the air hose and listen for leaks.
You must be logged in to view this image or video.
Step 5. Fix leaks and re test
Step 6. Uninstall tester and reinstall your intake pipe, MAF (remember to plug it in) & Air Box, BOV return line and PCV line.