

This tech article is to help those wanting to put the rare 2GB three point Talon Spoiler on their car without a 2GB Talon Hatch. Most folks including myself would think this is an easy install, drill a few holes and your good to go right?
Afraid not. Eagle did quite a bit of work to make that spoiler fit on the hatch. The molding of the metal on the inside of the hatch is Very different from the other 2G hatches.
Let's Begin.
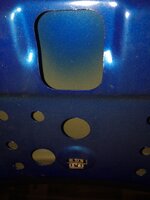
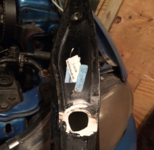
1. Prep your hatch. Obviously you need a 2G hatch. An Eclipse hatch or 2GA hatch for example will be the same metal mold. Patch/Fill any holes in the hatch. The 2GA Talon hatch will have 5 holes for the thumbnail spoiler mounts and one larger hole for the third brake light wire and if you want to delete the rear wiper. Remove the plastic panel inside the hatch. A couple of body work tricks, for the smaller diameter mounting holes you could use JB weld putty. Once hardened it actually sands smooth and is easier to work with than goopy bondo. Also for the larger holes, take an old refrigerator magnet like the ones Rock Auto sends and use that as a backing. The magnet will stick to the metal on the underside of the hole allowing you to fill the hole. You could also use a lid of a can but would have to hold it in place until your filler sets. Sand and paint!
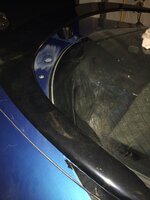
2. We need to prep the spoiler. The rear point under the third brake light is one mounting screw, a locating dowel and the wire for the light. Remove the locating dowel from the spoiler and throw it away. We don't need it and long term will only serve as one more way for water to enter and rust your car.
On the left and right sides of the spoiler underneath are two odd shaped lugs sticking out on an angle. Cut those off flush with the bottom of the spoiler. Use caution here as the spoiler is fiberglass and the dust is extremely itchy. It is nearly impossible to drill the correct hole for these lugs. Keep in mind it's and odd shape that also tapers and you would have to drill a second hole underneath to access the mounting lug. I tried twice to get this with no luck and decided it was not worth the hassle. Even if you could get it to align it would be a bear to seal and again keep from water getting in. This lug is actually a big reason a lot of the 2GB hatches are rotted out. The hole does not seal well and water goes inside the metal layers in the hatch rotting it out from the inside. So I highly recommend eliminating.
3. Prep your prepped hatch for drilling. Cover the hatch with painters tape in the areas where the spoiler is going to lay so as not to scratch. This will also allow you to mark where your holes are going after alignment. Mark the center of the hatch by measuring across and dividing by two. Don't go off the weatherstrip seam, it is not always center.
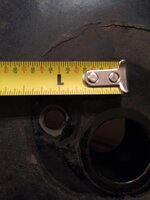
First 1.25 inches off the center line to the passenger side of the hatch.
Second measure 9.5 inches from the back of the hatch to intersect with the 1.25 mark you just made.
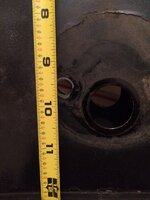
Third mark 10 inches from the back of the hatch to intersect with the center line.
You should have 2 cross marks on the hatch now. The cross mark toward the passenger side of the center mark is the mounting hole for the rear of the spoiler. Drill a 0.250 diameter hole center of that cross mark all the way thru both layers of the hatch straight down. If it is not already drilled out, Open the hole on the inside of the hatch you just drilled, large enough to get a socket in and tighten the future mounting bolt.
The cross mark on the centerline is for the wire harness. If you have the rubber grommet with the wire harness drill a 1" hole center of that cross mark. If you don't have the grommet, just drill a hole large enough to fit the wires/plug thru.
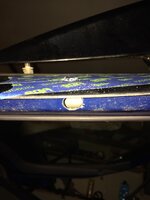
4. Install the mounting bolts into the spoiler on the left and right side ends hand tight. Remember we cut off those other lugs, these are the mounting holes on the very tips of the spoiler sides. Gently place the spoiler onto the hatch. Screw in the mounting bolt to the rear part of the spoiler from the inside of the hatch. Don't tighten all the way just snug to lock the rear of the spoiler in position.
5. Visually align the left and right sides of the spoiler on the hatch. Mark the outline with a marker on the painters tape. The bolts you installed will be laying on the hatch, carefully mark where those bolts are laying on the painters tape.
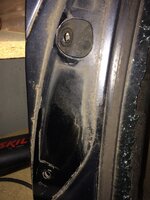
6. Remove the rear mounting bolt and remove the spoiler. Drill 0.250 diameter holes in the center of the bolt outline you just made for the left and right spoiler mounts. The hatch has 3 metal layers to it. When you drill thru the second layer stop. Lift the hatch back up and drill a pilot hole relative to the surface on the inside of the hatch. This will be an intersecting hole to get access to the mounting bolt. Drill open this hole large enough to fit a socket.
7. Remove the mounting bolts from the spoiler and apply a double sided weather strip tape to the perimeter of the mounting areas of the spoiler or a liberal amount of silicone for added sealant. Remove the painters tape from the hatch. Carefully lower the spoiler onto the hatch and install the three mounting bolts. The bolts should be tight but do not need to be torqued.
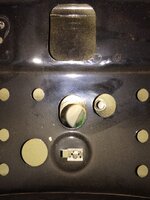
8. Install wiring for third brake light (plug for 2GA talon is the same). Install plastic panels. For additional weather sealing, lay a bead of silicone around the perimeter of the three mounting pads.
Afraid not. Eagle did quite a bit of work to make that spoiler fit on the hatch. The molding of the metal on the inside of the hatch is Very different from the other 2G hatches.
Let's Begin.
1. Prep your hatch. Obviously you need a 2G hatch. An Eclipse hatch or 2GA hatch for example will be the same metal mold. Patch/Fill any holes in the hatch. The 2GA Talon hatch will have 5 holes for the thumbnail spoiler mounts and one larger hole for the third brake light wire and if you want to delete the rear wiper. Remove the plastic panel inside the hatch. A couple of body work tricks, for the smaller diameter mounting holes you could use JB weld putty. Once hardened it actually sands smooth and is easier to work with than goopy bondo. Also for the larger holes, take an old refrigerator magnet like the ones Rock Auto sends and use that as a backing. The magnet will stick to the metal on the underside of the hole allowing you to fill the hole. You could also use a lid of a can but would have to hold it in place until your filler sets. Sand and paint!
2. We need to prep the spoiler. The rear point under the third brake light is one mounting screw, a locating dowel and the wire for the light. Remove the locating dowel from the spoiler and throw it away. We don't need it and long term will only serve as one more way for water to enter and rust your car.
On the left and right sides of the spoiler underneath are two odd shaped lugs sticking out on an angle. Cut those off flush with the bottom of the spoiler. Use caution here as the spoiler is fiberglass and the dust is extremely itchy. It is nearly impossible to drill the correct hole for these lugs. Keep in mind it's and odd shape that also tapers and you would have to drill a second hole underneath to access the mounting lug. I tried twice to get this with no luck and decided it was not worth the hassle. Even if you could get it to align it would be a bear to seal and again keep from water getting in. This lug is actually a big reason a lot of the 2GB hatches are rotted out. The hole does not seal well and water goes inside the metal layers in the hatch rotting it out from the inside. So I highly recommend eliminating.
3. Prep your prepped hatch for drilling. Cover the hatch with painters tape in the areas where the spoiler is going to lay so as not to scratch. This will also allow you to mark where your holes are going after alignment. Mark the center of the hatch by measuring across and dividing by two. Don't go off the weatherstrip seam, it is not always center.
First 1.25 inches off the center line to the passenger side of the hatch.
Second measure 9.5 inches from the back of the hatch to intersect with the 1.25 mark you just made.
Third mark 10 inches from the back of the hatch to intersect with the center line.
You should have 2 cross marks on the hatch now. The cross mark toward the passenger side of the center mark is the mounting hole for the rear of the spoiler. Drill a 0.250 diameter hole center of that cross mark all the way thru both layers of the hatch straight down. If it is not already drilled out, Open the hole on the inside of the hatch you just drilled, large enough to get a socket in and tighten the future mounting bolt.
The cross mark on the centerline is for the wire harness. If you have the rubber grommet with the wire harness drill a 1" hole center of that cross mark. If you don't have the grommet, just drill a hole large enough to fit the wires/plug thru.
4. Install the mounting bolts into the spoiler on the left and right side ends hand tight. Remember we cut off those other lugs, these are the mounting holes on the very tips of the spoiler sides. Gently place the spoiler onto the hatch. Screw in the mounting bolt to the rear part of the spoiler from the inside of the hatch. Don't tighten all the way just snug to lock the rear of the spoiler in position.
5. Visually align the left and right sides of the spoiler on the hatch. Mark the outline with a marker on the painters tape. The bolts you installed will be laying on the hatch, carefully mark where those bolts are laying on the painters tape.
6. Remove the rear mounting bolt and remove the spoiler. Drill 0.250 diameter holes in the center of the bolt outline you just made for the left and right spoiler mounts. The hatch has 3 metal layers to it. When you drill thru the second layer stop. Lift the hatch back up and drill a pilot hole relative to the surface on the inside of the hatch. This will be an intersecting hole to get access to the mounting bolt. Drill open this hole large enough to fit a socket.
7. Remove the mounting bolts from the spoiler and apply a double sided weather strip tape to the perimeter of the mounting areas of the spoiler or a liberal amount of silicone for added sealant. Remove the painters tape from the hatch. Carefully lower the spoiler onto the hatch and install the three mounting bolts. The bolts should be tight but do not need to be torqued.
8. Install wiring for third brake light (plug for 2GA talon is the same). Install plastic panels. For additional weather sealing, lay a bead of silicone around the perimeter of the three mounting pads.
Attachments
-
 IMG_0423.jpg60.8 KB · Views: 357
 -
 IMG_0425.jpg73.9 KB · Views: 333
 -
 IMG_0427.jpg78.7 KB · Views: 326
 -
 IMG_0428.jpg55.5 KB · Views: 361
 -
 IMG_0429.jpg85.5 KB · Views: 325
 -
 IMG_0450.jpg59 KB · Views: 330
 -
 IMG_0452.jpg90.2 KB · Views: 337
 -
 IMG_0453.jpg101.4 KB · Views: 369
 -
 IMG_0458.jpg181 KB · Views: 348
 -
 Picture1.png255.3 KB · Views: 375
