Oh great. One more DSM'er making another retarded, most likely, USEless tool.
Oh ya? Is that so? Well you can take that thought and blast it into space, along with those Tiffany CD's... because this is gonna blow you away! This is actually the most complicated, strategically made tool you'll ever see. Dare I say... Art like?
With this, it's small. Costs less than $10, and it tests that DSM cooling system in a snap. I was in a hurry and didn't have $70 for the Harbor Freight special which most likely won't be worth a ...crap. So let's begin!
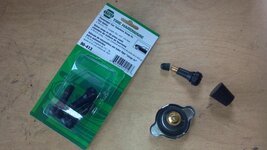
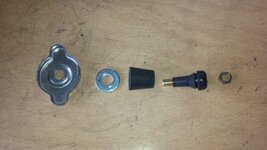
These are the parts which are consisted in this project. That's right, get yourself a pen and pad, straighten out that Dyslexia and you'll be <s>blowing up</s> (READ tips section) TESTING the cooling system in minutes!
- Radiator cap designed for your DSM water neck. It does not matter the quality, spring pressure rating, etc because we will be dismantling it anyway
- 7/16" flat washer
- Standard car tire valve. Also need the thin style nut which threads onto the stem. These can be had at your local tire shop. If they try to charge you for a damn nut, just give them a peek at what you're making and they'll be so darn impressed they'll even throw in a free set of tires.
- Rubber plug. Measures 3/4" at small end and 15/16" at big end. 15/16" in length. It's important to get this size for everything to work together correctly, OR get another size and screw up my calculations see what I care.
Steps are numbered which represent the attached pictures one after the other, in case the embedded pictures decide to break
1. Needed parts layout (minus the nut and washer, whoops!)
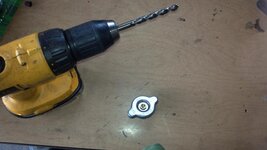
2. Take the new radiator cap and drill in the center until things fall apart. All you want is the top tin "handle" -if you will.
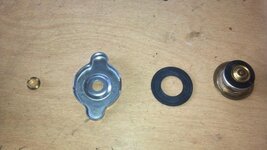
3. Layout of the radiator cap partially dismantled. See that metal piece there, second from left? This top piece is going to keep your face handsomely configured and underwear clean if you pressurize the system and the rubber wedge decides it doesn't want to do it's job, sending itself soaring 10 feet up. During fabrication of another tester I made, I observed this event. It should go without saying, but anyone who decides not to have this kind of safety built in, should get the "here's your sign" award from Bill himself.
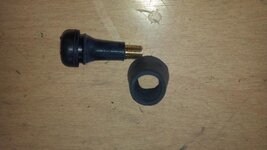
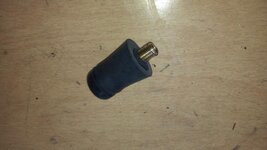
4. Take the rubber plug and drill it out until the tire valve can be pushed in and snug. I had to use a dremel to make a better fit but you'll get it
5. Pop that thing!
6. Exploded view of what you're putting together, in order
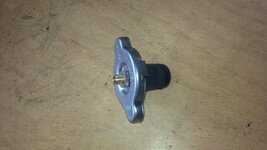
7. Whalah!
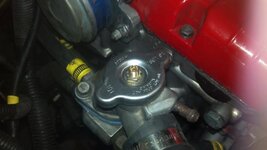
8. Here it is. Finished. Push the rubber plug down in the water neck and turn the radiator cap to lock in position. Now take a socket and tighten up the nut until the valve starts spinning. It should be sealed now.
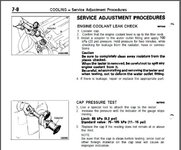
9. This is the coolant pressure check procedure out of the 90-91 Mitsubishi Factory Service Manual, along with specs of the opening pressures.
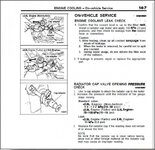
10. Same as above but for 97-99 years
*************
Okay so here it is, the tips section. Listen up, this tool is not idiot proof.
With this tool you may be tempted to hook up some shop air to that sucker with no worries...oh yeah! Oh, hell no. Please don't. Go back to the good ole' High school days and think about how fluids don't compress. You know what the only thing that might have some give? The rubber coolant hoses. After that error margin it's all downhill. Wanna get a face full of coolant and shriek like a little girl when that top hose blows up in your face? How about replace a water pump gasket? Perhaps throw down some money on a new radiator that was caused to crack. But hey, I understand, maybe you like the adrenaline rush. Well in that case, send me some pictures of the aftermath, and you and I, will both be entertained
SO, with that being said, I advise the use of a bicycle or a low pressure pump. Since that is partly why real coolant pressure tester kits come with a similar looking hand pump. However, if you set your shop air compressor to a low pressure, and are quick enough you shouldn't blow anything. Pump it up to 23PSI as per the FSM (pictured) and let it hold for a minute or two. Check the pressure in the system with a tire gauge. Keep in mind there isn't much air in the system so every time you check pressure with the gauge, it will let out a lot of the pressure. So be quick with that gauge!
Obviously, we all should know not to open radiator caps while they are hot, but just in case a warning isn't plastered on the cap, please don't do it! Chances are you aren't as quick on your feet as a cat is when a mysterious scalding hot liquid tries to flesh check you. You think hot coffee in your lap is bad, wait'll the element of surprise from coolant gets to ya!
You will need to drain about 1/4 of a QUART of coolant from the radiator before this. If you submerge the tester in the neck with coolant, you will be annoyed to find that coolant seeps from the valve when depressing the valve upon removal. Don't try to be a Slick Rick and pull it out real quick unless you want to clean up a moderate amount of spilled coolant.
*************
Well I think that about sums it up. I hope you enjoyed reading and making this simple tool. Please rate this article with how your tester came out. I will update this anytime if anybody has suggestions for a "better mousetrap"
Good luck and stay cool!
Oh ya? Is that so? Well you can take that thought and blast it into space, along with those Tiffany CD's... because this is gonna blow you away! This is actually the most complicated, strategically made tool you'll ever see. Dare I say... Art like?
With this, it's small. Costs less than $10, and it tests that DSM cooling system in a snap. I was in a hurry and didn't have $70 for the Harbor Freight special which most likely won't be worth a ...crap. So let's begin!
These are the parts which are consisted in this project. That's right, get yourself a pen and pad, straighten out that Dyslexia and you'll be <s>blowing up</s> (READ tips section) TESTING the cooling system in minutes!
- Radiator cap designed for your DSM water neck. It does not matter the quality, spring pressure rating, etc because we will be dismantling it anyway
- 7/16" flat washer
- Standard car tire valve. Also need the thin style nut which threads onto the stem. These can be had at your local tire shop. If they try to charge you for a damn nut, just give them a peek at what you're making and they'll be so darn impressed they'll even throw in a free set of tires.
- Rubber plug. Measures 3/4" at small end and 15/16" at big end. 15/16" in length. It's important to get this size for everything to work together correctly, OR get another size and screw up my calculations see what I care.
Steps are numbered which represent the attached pictures one after the other, in case the embedded pictures decide to break
1. Needed parts layout (minus the nut and washer, whoops!)
You must be logged in to view this image or video.
2. Take the new radiator cap and drill in the center until things fall apart. All you want is the top tin "handle" -if you will.
You must be logged in to view this image or video.
3. Layout of the radiator cap partially dismantled. See that metal piece there, second from left? This top piece is going to keep your face handsomely configured and underwear clean if you pressurize the system and the rubber wedge decides it doesn't want to do it's job, sending itself soaring 10 feet up. During fabrication of another tester I made, I observed this event. It should go without saying, but anyone who decides not to have this kind of safety built in, should get the "here's your sign" award from Bill himself.
You must be logged in to view this image or video.
4. Take the rubber plug and drill it out until the tire valve can be pushed in and snug. I had to use a dremel to make a better fit but you'll get it
You must be logged in to view this image or video.
5. Pop that thing!
You must be logged in to view this image or video.
6. Exploded view of what you're putting together, in order
You must be logged in to view this image or video.
7. Whalah!
You must be logged in to view this image or video.
8. Here it is. Finished. Push the rubber plug down in the water neck and turn the radiator cap to lock in position. Now take a socket and tighten up the nut until the valve starts spinning. It should be sealed now.
You must be logged in to view this image or video.
9. This is the coolant pressure check procedure out of the 90-91 Mitsubishi Factory Service Manual, along with specs of the opening pressures.
You must be logged in to view this image or video.
10. Same as above but for 97-99 years
You must be logged in to view this image or video.
*************
Okay so here it is, the tips section. Listen up, this tool is not idiot proof.
With this tool you may be tempted to hook up some shop air to that sucker with no worries...oh yeah! Oh, hell no. Please don't. Go back to the good ole' High school days and think about how fluids don't compress. You know what the only thing that might have some give? The rubber coolant hoses. After that error margin it's all downhill. Wanna get a face full of coolant and shriek like a little girl when that top hose blows up in your face? How about replace a water pump gasket? Perhaps throw down some money on a new radiator that was caused to crack. But hey, I understand, maybe you like the adrenaline rush. Well in that case, send me some pictures of the aftermath, and you and I, will both be entertained

SO, with that being said, I advise the use of a bicycle or a low pressure pump. Since that is partly why real coolant pressure tester kits come with a similar looking hand pump. However, if you set your shop air compressor to a low pressure, and are quick enough you shouldn't blow anything. Pump it up to 23PSI as per the FSM (pictured) and let it hold for a minute or two. Check the pressure in the system with a tire gauge. Keep in mind there isn't much air in the system so every time you check pressure with the gauge, it will let out a lot of the pressure. So be quick with that gauge!
Obviously, we all should know not to open radiator caps while they are hot, but just in case a warning isn't plastered on the cap, please don't do it! Chances are you aren't as quick on your feet as a cat is when a mysterious scalding hot liquid tries to flesh check you. You think hot coffee in your lap is bad, wait'll the element of surprise from coolant gets to ya!
You will need to drain about 1/4 of a QUART of coolant from the radiator before this. If you submerge the tester in the neck with coolant, you will be annoyed to find that coolant seeps from the valve when depressing the valve upon removal. Don't try to be a Slick Rick and pull it out real quick unless you want to clean up a moderate amount of spilled coolant.
*************
Well I think that about sums it up. I hope you enjoyed reading and making this simple tool. Please rate this article with how your tester came out. I will update this anytime if anybody has suggestions for a "better mousetrap"

Good luck and stay cool!
Attachments
Last edited by a moderator:


